A login page enables users and organizations to register and gain access to your system independently. You can do this using simple HTML and CSS codes.
You may be wondering what HTML and CSS are. Trouble, not yourself anymore. I am right here to explain them to you.
In today's century, you will agree that the E-market (Electronic market ) is the order of the day for one to gain more growth in his or her business. He or she needs a simple business or login page. The majority of websites use HTML5. In this article, I'll show you how to create a simple login form in HTML and CSS so you can use it immediately. Let's take a look at the meaning of HTML.
Introduction
HTML is the standard markup language for creating Web pages. HTML is a language used to communicate on the Internet. it is mainly used to describe the structure of a Web page. As a beginner, I suggest you start from here when learning a programming language.
CSS, on the other hand, is the language we use to style an HTML document. CSS describes how HTML elements should be displayed.
Today, as you have already found out from the title, I will walk you through creating a simple signup page using HTML and CSS. But don’t worry. Again, as the title says, this is your first signup page, which means the code is as simple as possible, and there will be an explanation to accompany each piece of code.
Prerequisite
A PC or Android/iOS.
Knowledge of Web forms.
A web browser.
A code and text editor.
Steps to Follow to create a simple signup page using HTML.
Step 1: Choose an HTML editor: you will need a text editor to create HTML code. I will be using VISUAL CODE EDITOR. On the Visual Code APP.
Step 2: Create your HTML file: create a folder on your file manager, you are free to name it whatever you want to. Open your text editor (VS code), create a new file, and save it with the .html extension. You can label your form however you like, like Gtworld.html.

Once you've signposted to the editor that you're creating HTML code. After that, write the following HTML code in the body section of your sign-up page. HTML code includes the two sections of the sign-in and signup pages.
<!DOCTYPE html>
<html lang="en">
<head>
  <link rel="stylesheet" href="style.css" />
</head>
|
Step 3. create a structure for the signup page using HTML.
<!DOCTYPE html>
<html lang="en">
<head>
<meta charset="UTF-8">
    <meta http-equiv="X-UA-Compatible" content="IE=edge">
  <meta name="viewport" content="width=device-width, initial-scale=1.0">
    <link rel="stylesheet" href="style.css">
    <title>Signup page</title>
</head>
<body>
    <div class="card">
        <div class="text-center">
            <h2>WELCOME TO GTWORLD</h2>
            <h2 class="up">Sign Up</h2>
            <h4>Please fill in this form to create an account</h4>
        </div>
        <div class="container ">
              <div class="contain">
                <form action="">
                    <label for="user"></label><br>
                    <input type="text" placeholder="USERNAME" min="0" maxlength="20" id="user1" required><br>
                    <label for="email"></label><br>
                    <input type="email" placeholder="EMAIL" id="email" email="email" required><br>
                    <label for="fname"></label><br>
                    <input type="text" placeholder="FULL NAME" id="fname" name="fname" required><br>
                    <label for="phone"></label><br>
                    <input type="tel" placeholder="PHONE NO" min="0" maxlength="11" id="phone" required><br>
            </div>
            <div class="contain2">
                    <label for="gender"></label><br>
                    <select name="gender" id="gend">
                        <option value="Male">Male</option>
                        <option value="female">Female</option>
                        <option value="others">Others</option>
                    </select> <br>
                    <label for="age"></label><br>
                    <input type="date" placeholder="DOB" name="" id="age" required><br>
                    <label for="pass"></label><br>
                    <input type="password" placeholder="PASSWORD" min="0" maxlength="10" size="10" id="pass" required><br>
                    <label for="pass"></label><br>
                    <input type="password" placeholder="REPEAT PASSWORD" min="0" maxlength="10" size="10" id="pass" required><br>
          </div>
        </div>
        <div class="px">
            <input type="checkbox" id="remember" name="remember" value="remember" >
            <label for="remember">Remember me</label><br>
            <p>By creating an account you agree to our terms & privacy.</p>
        </form>
        </div>
        <div class="text-center">
            <input type="submit" value="CANCEL" id="cancel" class="sub">
            <input type="submit" value="SIGN UP" id="signup" class="sub">
            <h4 class="already">Already a member? <a href="login.html" target="_blank">Log In</a></h4>
        </div>
    </div>
</body>
</html>
|
Step 4. Also, create a structure for the login page.
<!DOCTYPE html>
<html lang="en">
<head>
    <meta charset="UTF-8">
    <meta http-equiv="X-UA-Compatible" content="IE=edge">
    <meta name="viewport" content="width=device-width, initial-scale=1.0">
    <link rel="stylesheet" href="style.css">
    <title>loginpage</title>
</head>
<body>
    <div class="card-login">
        <div class="log">
            <div class="login">
                <h1>Login</h1>
                <form  action="">
                    <label for="user"></label><br>
                    <input type="text" id="user" placeholder="EMAIL ADDRESS"><br>
                    <label for="pass"></label><br>
                    <input type="password" placeholder="PASSWORD" min="0" maxlength="10" size="10" id="pass" required><br>
                    <p class="for">forgot password?</p>
                    <input type="submit" value="Log In" class="sub">
                </form>
                <h4 class="mt mb">Don't have an account with us? <a href="gtworld.html" target="_blank">Sign Up</a></h4>
            </div>
        </div>
    </div>

</body>

</html>
|
|
Step 5. Next, we are adding CSS to style our signup page and login page
|
body {
    padding: 0;

    margin: 0;

    background-image: url("./1674222743851\ (2).jpg");

    background-position: center;

    background-repeat: no-repeat;

    background-color: rgba(0, 0, 0, 0.753);

    background-blend-mode: overlay;

    color: rgb(10, 102, 10);

    font-family: Verdana, Geneva, Tahoma, sans-serif;

}


input {

    width: 350px;

    padding: 15px;

    margin-bottom: 10px;

    / border-color: transparent; /

    border-radius: 5px;

    background: rgba(255, 255, 255, 0.452) !important;

}


#remember {

    width: 10px;

}


#cancel, #signup {

    width: 180px;

    padding: 5px;

}


a{

    color: rgb(18, 92, 18);


}

#gend {

    width: 380px;

    padding: 15px;

    margin-bottom: 10px;

    / border-color: transparent; /

    border-radius: 5px;

    background-color: rgba(255, 255, 255, 0.378);


}


p, .already{

    margin-top: 0;

    margin-bottom: 8px;

}


h4 {

    margin-top: 0;

    margin-bottom: 7px;

}


.up {

    margin-bottom: 8px;

}


.container {

  display: flex;

  justify-content: space-evenly;

  margin-top: 0px;

}


.contain2 {

    margin-top: 0px;

}


::placeholder{

    color: black;

}


.log {

    display: flex;

    justify-content: center;

    margin-top: 5%;

}


#user{

    margin-top: 15px;

    margin-bottom: 30px;

    border-color: black;

}


h1{

    margin-bottom: 10px;

}


#pass {

    border-color: black;

    margin-bottom: 0;

}

.sub {

    width: 380px;

    border-color: black;

    font-weight: bolder;

    font-size: 17px;

}


.for {

    margin-top: 0;

    margin-bottom: 30px;

    text-align: right;

}


.card-login {

    border-radius: 15px;

    position: absolute;

    padding: 20px;

    margin: 10%;

    left: 20%;

    right: 20%;

    background-color: #ffffff;

    background-image: url("./1674222743851\ (2).jpg");

    background-position: center;

    background-repeat: no-repeat;

    background-blend-mode: overlay;

    border: 1px #ddd solid;

}


.card {

    background-image: url("./1674222743851\ (2).jpg");

    background-position: center;

    background-repeat: no-repeat;

    background-blend-mode: overlay;

    border-radius: 15px;

    position: absolute;

    padding: 30px;

    margin: 4% 0% 0% 5%;

    left: 10%;

    right: 10%;

    background-color: #ffffff;

    border: 1px #ddd solid;

}


.shadow {

    box-shadow: 5px 5px rgb(22, 22, 22);

}


.px {

    padding-left: 45px !important;

    padding-right: 15px !important;

}


.mb {

    margin-bottom: 15px !important;

}


.mt {

    margin-top: 15px !important;

}


.mr {

    margin-right: 15px !important;

}


.sub:hover {

    background-color: rgba(0, 0, 0, 0.753) !important;

    color: #ffffff;

    transition: .5s linear;

}


.text-center {

    text-align: center !important;

}
|
4) Before Applying the CSS the output look like this:
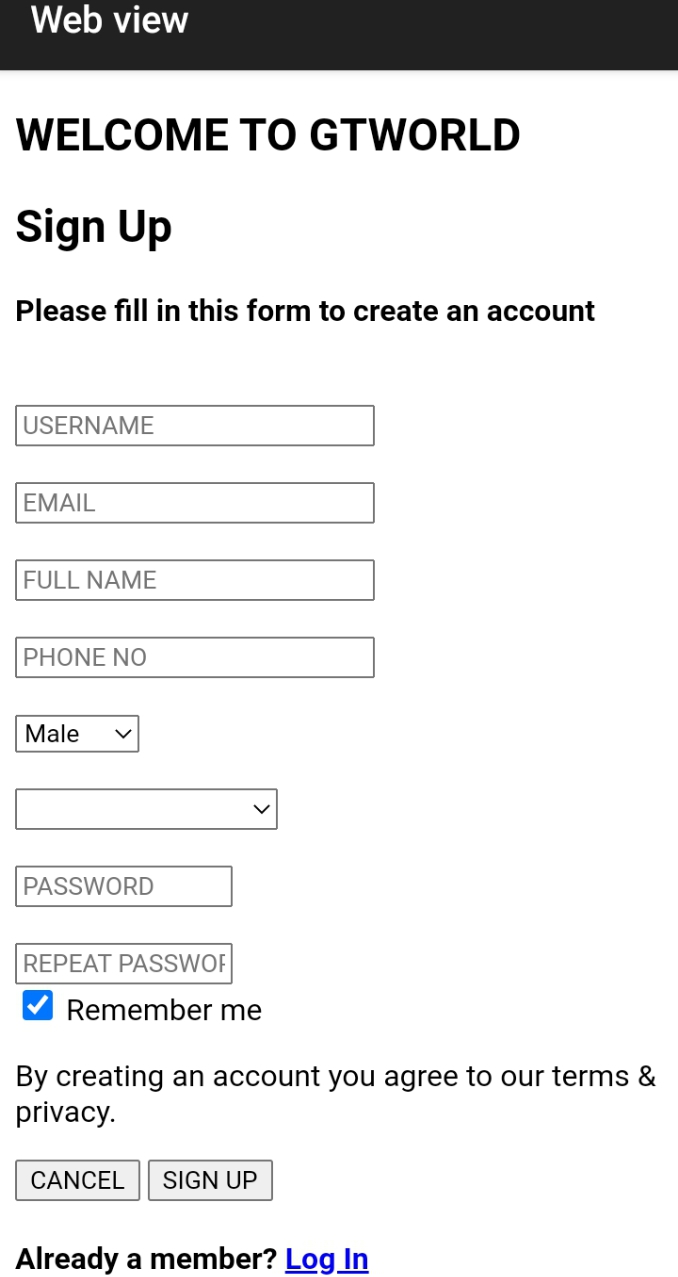
5) After Applying the CSS our final output will look like this:

A Signup and login page has been successfully created.
Conclusion
A signup page (also known as a registration page) enables users and organizations to independently register and gain access to your system and this can be achieved through HTML and CSS.